Pageviews

Saturday, 22 February 2014

How to disable secure boot and fast boot in Windows 8

by Unknown  |  in Windows at  Saturday, February 22, 2014
Windows 8 has got a very special feature named "Secure Boot".Until this is enabled you are unable to load any new Operating System on your system.It basically prevent unauthorized Softwares to load into your system.But this also got a disadvantage that it prevents you from creating Dual boot for your system.

Another special feature Windows 8 provide you is "Fast Boot".Fast boot helps you boot your system faster than any other OS.That is why Windows 8 boot at lightening speed.

How to disable Secure boot in Windows 8

1. Press Win+C button to open charm screen.Click Settings.


Disable secure boot in Windows 8


2.Now click on change PC settings.

3.Select General and under the Advanced Startup click in Restart now as shown below

Disable secure boot in Windows 8


4.Now your system will restart and new windows will open,select Troubleshoot

Disable secure boot in Windows 8


5.Under the troubleshoot click on Advanced options and then on UEFI Firmware Settings.Now from here your actual task will begin.
Disable secure boot in Windows 8

6.Click on Restart and wait for the system to restart.

7.After restart you will be taken to the BIOS Setup menu,if not taken automatically you need to press the F1,F2,Esc key depending on the key your system uses.

8.Under the Security,you will see an option namely Secure boot make it disabled.You might also find this option under the boot menu of your BIOS.If you see UEFI boot option then make it disabled.

Disable secure boot in Windows 8

9.Now save your Settings and Enjoy the dual boot in your system.


How to disable Fast boot in Windows 8

Another option you also want in order to load any other OS into your system,is to disable fast boot in Windows 8.

1.Go to your Control Panel<Power options.

Disable Fast boot in Windows 8

2.Now click on "Choose what the power buttons do" and then click on "Change settings that are currently unavailable"

Disable Fast boot in Windows 8

3.Now uncheck the "Turn on Fast startup" option.You are done.


Having both of the above steps done,you will be able to create dual boot for your Windows 8 system.


Monday, 3 February 2014

UPDATE,DELETE Operation in PostgreSQL Database

by Unknown  |  in Java at  Monday, February 03, 2014
As discussed in previous post you had learnt about two basic operations on database i.e. INSERT,SELECT ,in this post I am going to discuss the another two basic operations of PostgreSQL database i.e. UPDATE and DELETE.Lets get started.

UPDATE operation in PostgreSQL Database:

In this operation,we will make use of UPDATE keyword as used in simple SQL language just like below:

             String sql;
             sql = "UPDATE TABLE_NAME set column_name = value  where id = value;";
             st.executeUpdate(sql);

The example for this can be:

              String sql;
             sql = "UPDATE NEW_GARAGE set age = 25 where id = 4;";
             st.executeUpdate(sql); 


Complete code snippet for Update Operation:


package database;
import java.sql.Connection;
import java.sql.DriverManager;
import java.sql.ResultSet;
import java.sql.SQLException;
import java.sql.Statement;
import java.util.logging.Level;
import java.util.logging.Logger;
public class Update {
    public static void main(String args[])
    {
    Connection c = null;
    Statement st = null;
     {
        try {
            Class.forName("org.postgresql.Driver");
             c = DriverManager.getConnection("jdbc:postgresql://localhost:5432/kanwar","postgres","osm");
             c.setAutoCommit(false);
              st = c.createStatement();
             
             String sql;
             sql = "UPDATE NEW_GARAGE set age = 25 where id = 4;";
             st.executeUpdate(sql);
             c.commit();
         ResultSet rs = st.executeQuery( "SELECT * FROM NEW_GARAGE;" );
         while ( rs.next() )
         {
             int id = rs.getInt("id");
             String name = rs.getString("name");
              int age = rs.getInt("age");
      System.out.println( "ID = " + id );
      System.out.println( "NAME = " + name );
      System.out.println( "AGE = " + age );
      System.out.println();
         }
         rs.close();
         st.close();
         c.close();
        }
   
catch ( Exception e )
{
    System.err.println( e.getClass().getName()+": "+ e.getMessage() );
System.exit(0);
}
          System.out.println("Operation done successfully");  
 }
}
The output for this program goes here:

Update operation in Postgresql database


DELETE Operation in  PostgreSQL Database:

Delete operation in PostgreSQL database is executed the same query as in SQL language.We use DELETE keyword and the data which we want to delete.The syntax for Delete operation is as follow:

String sql = "DELETE from Table_Name where column_name=value;";
The example of this syntax ca be:

String sql = "DELETE from NEW_GARAGE where ID=2;"; 

Complete code snippet for DELETE operation is as below:


package database;
import java.sql.Connection;
import java.sql.DriverManager;
import java.sql.ResultSet;
import java.sql.Statement;

public class Delete {
    public static void main(String args[])
    {
      Connection c =null;
      Statement st = null;
        try
        {
           Class.forName("org.postgresql.Driver");
           c = DriverManager.getConnection("jdbc:postgresql://localhost:5432/kanwar","postgres","osm");  
       
       c.setAutoCommit(false);
       System.out.println("Opened Database Successfully");
        st = c.createStatement();
        String sql = "DELETE from NEW_GARAGE where ID=2;";
        st.executeUpdate(sql);
        c.commit();
        ResultSet rs = st.executeQuery("SELECT * FROM NEW_GARAGE");
       
        while(rs.next())
        {
        int id = rs.getInt("id");
        String name = rs.getString("name");
        int age = rs.getInt("age");
       
        System.out.println( "ID = " + id );  
          System.out.println( "NAME = " + name );
          System.out.println( "AGE = " + age );    
      System.out.println();
      }
      rs.close();
      st.close();
      c.close();
      }
        catch(Exception e)
        {
        System.err.println(e.getClass().getName()+":"+ e.getMessage());
        System.exit(0);
       
        }
        System.out.println("Operation performed Successfully");
        }
        }
     
The output for this program goes here:

Delete operation in Postgresql database


Happy learning.Stay tuned.


Friday, 31 January 2014

SELECT,INSERT Operation in PostgreSql Database

by Unknown  |  in Java at  Friday, January 31, 2014
PostgreSql as discussed in earlier posts is an advanced database.Now in this post I am going to discuss the two basic database operations in Postgresql i.e. Insert,Select.The remaining two operations i.e. Update,Delete will be discussed in the next post.

1. Insert operation in Postgresql database

As the name suggests,this operation is basically used for Inserting values into your database,below is the command used to Insert data into database using Insert statement.

"INSERT INTO TABLE_NAME(COLUMN1,COLUMN2,COLUMN3)"+ "VALUES(1,'TROY',35);";
Here is the complete code snippet for the Insert operation:

package database;
import java.sql.Connection;
import java.sql.DriverManager;
import java.sql.Statement;
public class Insert_operation {
    public static void main(String args[])
    {
    try
    {
       Statement st = null;
       Connection c = null;
       Class.forName("org.postgresql.Driver");
       c=DriverManager.getConnection("jdbc:postgresql://localhost:5432/kanwar","postgres", "osm");

c.setAutoCommit(false);  
 
    st = c.createStatement();
    String sql;
    sql = "INSERT INTO NEW_GARAGE(ID,NAME,AGE)"+"VALUES(1,'Tarsem',35);";
        st.executeUpdate(sql);
 
        sql = "INSERT INTO NEW_GARAGE(ID,NAME,AGE)"+ "VALUES(2,'Gurpreet',36);";
        st.executeUpdate(sql);
 
   sql = "INSERT INTO NEW_GARAGE(ID,NAME,AGE)"+ "VALUES(3,'Jaspreet',37);";
        st.executeUpdate(sql);
     
          sql = "INSERT INTO NEW_GARAGE(ID,NAME,AGE)"+ "VALUES(4,'Maninder',39);";
        st.executeUpdate(sql);
     
          sql = "INSERT INTO NEW_GARAGE(ID,NAME,AGE)"+ "VALUES(5,'Ranjeet',38);";
        st.executeUpdate(sql);


    st.close();
    c.commit();
    c.close();
    }
    catch(Exception e)
            {
                System.err.println( e.getClass().getName()+": "+ e.getMessage() );
                System.exit(0);
            }
 
    System.out.println("Records created successfully");
     
 
    }
}
 This way your records are successfully saved into the database.

Insert ,Select operation in postgresql database


2.Select Operation in Postgresql database:

Since the insert operation helps us to insert the records into database,and the select statement help us to select the respective records specified in the query.

You can simply select a record using Select statement just like below:

"SELECT * FROM TABLE_NAME;"

 Here is the complete code snippet for illustrating the use of Select operation


package database;
import java.sql.Connection;
import java.sql.DriverManager;
import java.sql.ResultSet;
import java.sql.Statement;
public class Select_operation {
    public static void main(String args[])
    {
     Connection c = null;
     Statement st = null;
 
      try
      {
       Class.forName("org.postgresql.Driver");
         c= DriverManager.getConnection("jdbc:postgresql://localhost:5432/kanwar" ,"postgres", "osm");
         c.setAutoCommit(false);
        st = c.createStatement();
        ResultSet rs = st.executeQuery( "SELECT * FROM NEW_GARAGE;" );
   
      while ( rs.next() )
      {
        int id = rs.getInt("id");
          String name = rs.getString("name");
          int age = rs.getInt("age");
     
           System.out.println( "ID = " + id );
          System.out.println( "NAME = " + name );
          System.out.println( "AGE = " + age );  
      System.out.println();
      }
      rs.close();
      st.close();
      c.close();
      }


      catch(Exception e)
        {
        System.err.println(e.getClass().getName()+": "+ e.getMessage());
        System.exit(0);
        }
        System.out.println("Operation performed successfully");
     
     
    }
}
Here is the output of the Select query:

Select operation in postgresql database

Happy learning.Stay tuned.


Thursday, 30 January 2014

How to find out when Google last crawled you ?

by Unknown  |  in Tutorials at  Thursday, January 30, 2014
Google,being the World's most powerful search engine keeps visiting the websites and blogs in order to update the information.The frequency of visit to the site depends upon the quality of your site.

For example : Newly created blogs are visited just once in a month.The blogs which are daily updated and have a high rank are visited daily.Blogs with less content and updation are visited once a month.

So,its crystal clear that you can know how much Google loves you in terms of its visits frequency.Everyone wants Google to visit its site as a chief guest daily.If Google comes to your site daily,visitors will automatically follow the trend.

When Google crawled you recently?

Here is the tip for you to check the last visit to your site or blog

Go to the google search bar and type the address of your blog/site.Click on the down arrow and click Cached.


Here is the time when Google last crawled my blog.


Thursday, 23 January 2014

How to create a table in Postgresql database through Java

by Unknown  |  in Database at  Thursday, January 23, 2014
In the previous post,I had discussed about the connectivity of Java and Postgresql,now in this post I am going to discuss of how to create a table in Postgresql database:

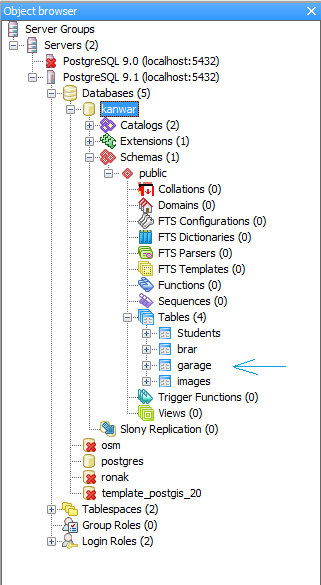
Here is our PgAdminIII before making a table:


Here is the code snippet of creating a table in Postgresql database:


package database;
import java.sql.Connection;
import java.sql.DriverManager;
import java.sql.SQLException;
import java.sql.Statement;
import java.util.logging.Level;
import java.util.logging.Logger;
public class Database {

   public static void main(String args[]) {
        try {
            Connection c = null;
            Statement stmt = null;
         
            try {
               Class.forName("org.postgresql.Driver");
               c = DriverManager.getConnection("jdbc:postgresql://localhost:5432/kanwar","postgres", "osm");
            } catch (Exception e) {
               e.printStackTrace();
               System.err.println(e.getClass().getName()+": "+e.getMessage());
               System.exit(0);
            }
            System.out.println("Opened database successfully");
              try {
                  stmt = c.createStatement();
              } catch (SQLException ex) {
                  Logger.getLogger(Database.class.getName()).log(Level.SEVERE, null, ex);
              }
         String sql = "CREATE TABLE GARAGE "+ "(NAME TEXT       NOT NULL,"
                 +     "AGE             INT                  NOT NULL)";//Here I had created a new table named 'Garage' using simple sql statement


         stmt.executeUpdate(sql);
         stmt.close();
         c.close();
        } catch (SQLException ex) {
            Logger.getLogger(Database.class.getName()).log(Level.SEVERE, null, ex);
        }
        catch(Exception e)
        {
   System.err.println( e.getClass().getName()+": "+ e.getMessage() );
   System.exit(0);
        }
        System.out.println("Table Created Successfully");
           }
}
    Now have a look at your PgAdminIII after the table creation.


Thats it you had created a new table in Postgresql database.

Wednesday, 22 January 2014

Java PostgreSQL Connectivity example:

by Unknown  |  in Database at  Wednesday, January 22, 2014
This tutorial covers the basics of PostgreSQL programming with Java.In this tutorial, we are going to use the PostgreSQL JDBC Driver driver.It is the official JDBC driver for PostgreSQL.

JDBC tutorial

What is PostgreSQL:


PostgreSQL is a powerful,open source object-relational database system.It is a multi-user database management system.It runs on multiple platforms including Linux, FreeBSD, Solaris, Microsoft Windows and Mac OS X.PostgreSQL is developed by the PostgreSQL Global Development Group.PostgreSQL is not controlled by any corporation or other private entity and the source code is available free of charge.

Advantages of PostgreSQL:

PostgreSQL runs on all major operating systems,including Linux,UNIX (AIX, BSD, HP-UX, SGI IRIX, Mac OS X, Solaris, Tru64), and Windows. It supports text,images,sounds,and video,and includes programming interfaces for C / C++ ,Java,Perl,Python,Ruby,Tcl and Open Database Connectivity (ODBC).PostgreSQL supports a large part of the SQL standard and offers many modern features including the following:


  1. Complex SQL queries
  2. SQL Sub-selects 
  3. Foreign keys
  4. Trigger 
  5. Views
  6. Transactions
  7. Multiversion concurrency control (MVCC) 
  8. Streaming Replication (as of 9.0) 
  9. Hot Standby (as of 9.0)


Pre-requisite Softwares:

Before using PostgreSQL in our Java programs,we need to make sure that we have PostgreSQL JDBC and Java set up on our machine.

1.Download latest version of postgresql-(VERSION).jdbc.jar from postgresql-jdbc repository.

2.Add downloaded jar file postgresql-(VERSION).jdbc.jar in your class path, or you can use it along with -classpath option as explained below in examples.

Make sure you install the PostgreSQL,Postgre SQLJDBC driver according to your JDK versions,to check you JDK version installed on your computer,click here.


Connecting to the Database:

import java.sql.Connection;
import java.sql.DriverManager;
public class PostgreSQLJDBC { public static void main(String args[])
{
 Connection c = null;
try
{
 Class.forName("org.postgresql.Driver"); //Registering PostgreSQL JDBC Driver
c = DriverManager .getConnection("jdbc:postgresql://localhost:5432/kanwar", "postgres", "osm"); //Here my database name is 'Kanwar' and username is 'postgres' and password is 'osm'
}
catch (Exception e)
{
e.printStackTrace();
System.err.println(e.getClass().getName()+": "+e.getMessage());
 System.exit(0);
}
System.out.println("Opened database successfully");
}
}


This way a new Database will be created.Open your PgAdminIII and check the new database created.


Introduction to JDBC(Java Database Connectivity)

by Unknown  |  in Java at  Wednesday, January 22, 2014
What is JDBC?

JDBC stands for Java Database Connectivity, which is a standard Java API for database-independent connectivity between the Java programming language and a wide range of databases.

The JDBC library includes APIs for each of the tasks commonly associated with database usage:


  •  Making a connection to a database
  •  Creating SQL or MySQL statements
  •  Executing that SQL or MySQL queries in the database
  •  Viewing & Modifying the resulting records


JDBC Environment setup

Before connecting your code to the database,make sure that you have done following setup:

1. Core JAVA Installation
2. Any Database Installation

Apart from the above you need to setup a database which you would use for your project.

Creating JDBC Application:

JDBC application creation can be broadly divided into some easy and small steps.

Step 1: Importing required packages

import java.sql.*;

Step 2: Register JDBC driver

It basically initializes a driver so that you can open a communication channel with the database.Following is the code snippet to achieve this:

Class.forName("org.postgresql.Driver"); //I am using Postgresql database.


Step 3: Open a Connection

This step requires a method i.e. DriverManager.getConnection() method to be create a Connection object which represents a physical connection with the database.

con = DriverManager.getConnection(DB_URL,USER,PASS);

Step 4 : Executing a query

This step will help you to build a statement that will build and submit as a SQL statement to the database.

stmt = conn.createStatement();
String sql;
sql = "SELECT id, first, last, age FROM Students";
ResultSet rs = stmt.executeQuery(sql);

Step 5: Extracting data from result set

This step will help you in fetching data from database.You can use the appropriate Result.getXYZ()


while(rs.next())
{ //Retrieve by column name
int id = rs.getInt("id");
int age = rs.getInt("age");
//Displaying values
System.out.println("ID:"+ id);
System.out.println(",Age :"+ age);

Step 6: Closing the environment

Its a good habit to close all database resources before program exits.

rs.close();
stmt.close();
con.close();


This post was just a simple introduction about JDBC,in the next post we will discuss about the new and powerful database i.e. PostgreSQL.

Saturday, 18 January 2014

How to check JDK version which is installed on your computer

by Unknown  |  in Java at  Saturday, January 18, 2014
Here’s a quick guide to show the use of “java -version” command to check the current JDK version that is installed on your computer.
1. Open your Command prompt in Windows or terminal in *nix.
2. Type “java -version“.

In this case,JDK "1.7.0_04" is installed.

Friday, 17 January 2014

How to reset Postgre SQL Database Password

by Unknown  |  in Database at  Friday, January 17, 2014
PostGreSql is the World's most advanced open source database.Postgre SQL can hold a large amount of data,that is what it is known for.But there is big problem related with it,that is with the Superuser password.This problem is basically faced by Windows users because Linux and Mac users does not need password during installation.

90% of the users forget this password,this password is required during installation.Now for all that users,here is the solution for that error.You need not to worry,just follow the below steps:

1.Firstly,run your Command Prompt as Administrator.


2. Now type the following command
net user postgres *

3.Now here you can reset your password,and continue with your Installation of Database.

How to uninstall Postgres ?

Uninstalling Postgres is a simple way to remove Postgres from your System,but this wont remove the SuperUser account from your System.If you want a fresh installation,it will again ask for password.So in order to remove the Superuser account also,you need to execute the following command in the Command prompt.

net user postgres /delete


How to Update your Blogger Theme

by Unknown  |  in Blogger at  Friday, January 17, 2014
Your Blog theme is the major source of attraction for number of visitors.But,sadly Google by default does not provide you a range of attractive Blogger themes,but there are certain websites which offers free and attractive templates to you.So,here are the simple steps to update your Blogger theme:

1.You need to visit any site which offers you blogger themes,one example can be BTemplates,now download any of the theme you love.

2.The theme provided to you will be in .zip format,which you need to extract.Now go to your Blogger Dashboard > Theme.On the top right side,click on this


3.After clicking,a small window will open up,

4.Click on Choose file,now upload the yourtheme.xml file and click on Upload,and you are done with your theme.Enjoy


Thursday, 16 January 2014

How to Protect your Blog from Click Bombing

by Unknown  |  in Blogger at  Thursday, January 16, 2014

What is Click Bombing?

Suppose you had a blog/website running Google Adsense.You always want that your earnings go in smooth way,but there are some terms like Click Bombing which won't allow you to do so.Now,basically you must know what is Click Bombing,it is a process by which a hacker person installs a software in his computer and sets your website's particular ad or position as a click target. With high-speed internet, the software is able to perform around 1k clicks per minute which is simply impossible for a human hand. I hope now you are familiar with click bombing.You can thought of it as a great enemy of your Blog.

Why Click Bombing is Harmful?

According to Google Adsense policies, you must receive high quality and legal clicks on your Adsense ads. Google does not scan the DNA of the person clicking the ad so most probably, the Adsense team will consider them as fraud clicks by YOU and finally, your account will be BANNED.Google Adsense Team always track your website/blog upon the quality of clicks,so this invalid click will definately prove costly to you.

-> Remedies to prevent Click Bombing:

#1: Finding Suspects

First of all, you have to find who are doing click bombing on your site.Sometimes,the software only uses a particular IP address to access website. In that way, you can simply go to Google Analytics and know the activity of each and every user on your site.Check the IP address which receives most hit on your site and leave fastest. Simply use any ban plugin for WordPress or any site for blogger to ban that IP.

#2: Banning IP

You can easily ban their IP from any site or software or plugin in WordPress.

How to tell Google Adsense Team about Click Bombing?

Google is never against innocents lambs.If you are a victim of click bombing,then inform Google Adsense special team immediately about this! To do that, follow the steps below:
  1. Go to Google Adsense Invalid Click Page
  2. Carefully fill each and every detail about click bombing on your Adsense account. If possible, mention IP or IP's from where you receive invalid clicks.
  3. That's it! Leave the rest on Smart Team(Team Adsense).


Wednesday, 15 January 2014

How to Add Facebook like button below Post Titles in Blogger

by Unknown  |  in Blogger at  Wednesday, January 15, 2014
As you all know,sharing is becoming a trend.If you want to drive traffic to your site or Blog,then you definately need to share your posts on your Facebook page,for getting good traffic,you need good amount of "Likes" for your Fb page.

So whenever a user comes to visit your Blog,if he likes your stuff must also see an Fb like button on your Blog,so here are some simple steps to add Fb like button on your Blogger.

1.First of all go to your Blogger Dashboard > Template > Edit Html.


2.After a box will open,which will consist of coding of your Layout,now press Ctrl+F and search for this following tag.

<data:post.body/>
NOTE: You might find more than 3 occurences of the tag in your code,just stop at the second and paste the following code in it
<p><iframe allowTransparency='true' expr:src='&quot;http://www.facebook.com/plugins/like.php?href=&quot; + data:post.url + &quot;&amp;layout=button_count&amp;show_faces=false&amp;width=100&amp; action=like&amp;font=arial&amp;colorscheme=light&quot;' frameborder='0' scrolling='no' style='border:none; overflow:hidden; width:100px; height:20px;'/></p>

 3. Save your Template and you are done.


Friday, 10 January 2014

How to add a Page in Blogger in 3 simple steps

by Unknown  |  in Tutorials at  Friday, January 10, 2014
Blogger pages are defined in Google Blogspot to add functionality to the Blog.Whenever the user clicks on the page it takes user to the new page.Pages basically provides you the tabs format of the blog,now here are some simple steps to add a new Page in Blogger:

1.Login to your Blogger account,in your Dashboard click on Pages button,it will open up this window in front of you


2.Now click on the New Page button and click on Web Address,it will open up a dialog box,now in the Title,write the title of the Page you want to set,and in the Web Adress(URL) paste the address of the label where you want to send the user.

For instance,I want to direct my users to Page where they can find only Android posts,I will use like this:

How to add Pages in Blogger

 3.Now you are just one step away,after that in order to create your Blog pages appear as Top Tabs on the Blog,you need to select Top Tabs option.After that click Save arrangement.

How to add Pages in Blogger


Your are done.Enjoy.


Thursday, 9 January 2014

How to enable Wireless adhoc network in Windows 8

by Unknown  |  in Windows at  Thursday, January 09, 2014
Creating an adhoc network in Windows 8 is quite different as compared to Windows 7.Here are the simple steps to start and run an adhoc network in Windows 8.

1.First of all we need to check whether our NIC(Network Interface Card) support Adhoc network mode,for this we need to run our Cammand Prompt as Administrator,

How to enable Wireless Adhoc Network in Windows 8


2.After running your Command Prompt as Administrator,you need to check for your hardware,whether it supports the hosted network mode or not by typing the following command:

netsh wlan show drivers


How to enable Wireless Adhoc Network in Windows 8
Add caption


If Hosted network supported says Yes,then you are all set.Otherwise,you need to upgrade your hardware, if the software update does not fixes it.

3.Now  we will begin our network setup bu writing the following command:

netsh wlan set hostednetwork mode=allow ssid=<enter_network_name_here> key=<enter_password_here> 

How to enable Wireless Adhoc Network in Windows 8


4. Till now, your hosted network has been created. Now, you need to start it. Use the command below:

netsh wlan start hostednetwork

How to enable Wireless Adhoc Network in Windows 8

5.  Now you are all set, with just one thing remaining. If it’s not already enabled, you need to allow Internet Connection Sharing (ICS) for your currently-active internet connection. Simply head over to Network & Sharing Center, and in the properties for the current internet connection, enable ICS. Make 
sure to select the ad hoc connection under Home Networking connection.

How to enable Wireless Adhoc Network in Windows 8


6.Enjoy your Adhoc network.


Monday, 28 October 2013

Introduction to Android files

by Unknown  |  in Android at  Monday, October 28, 2013
Android files:     Android is a Linux based Operating System,it uses a big collection of files in order to develop Applications for our Android phones.Below is a small but useful overview of each and every file used in creating an Android Application:


As you see in the image ,I had created a new project named 'Kodingpoint',which has by default the following files and folders in it.

1src-- stands for Source it contains the files that contains our source code,all the java codes which we write in our project are in this folder.All the files are saved with .java extension automatically.
2.gen- stands for Generated.This contains all the java files which will be automatically generated during project,it contains the most important file of the project named R.java,this files includes all the unique Id's we assign to our textfields,button,edittext etc.If R.java is deleted or modified,you will not be able to run your project.

3.Android 4.3 and Android Private Libraries :consists of collection of all the packages of Android,we will use in our App development.It contains all the packages like Bluetooth,Wi-fi etc.

4.Assets: It is the folder in which we can keep our different types of files like we can keep our HTML,PHP,Javascript files etc. 

5.Bin- In this folder,we have our .apk file of our application,whenever we want to install any app on our file,we simply need to go to bin folder and send appname.apk to our device.
                                                                                                                        It further consists of another important files and folder like res,which will be explained later.

6. Libs: It stands for libraries,all the libraries which consists of .jar files comes under this folder.By default it consists of android-support.jar file,we can add further jar files according to the requirement of our project.

7.res: It stands for Resolution, under this folder all the resolutions supported by our app is given here,it further consists of drawable folder,values,Manifest etc.

8.Drawable: It consists of drawable resolution sizes supported by our app,it consists of :

drawable hdpi(high dots  per inch)
drawable mdpi(medium dots per inch)
drawable ldpi(lower dots per inch)
drawable xhdpi(Extra high dots per inch)
drawable xxhdpi(Extra Extra high dots per inch)


Whenever we are developing applications for multiple screens we need to draw different layouts for each screen.

9.layout: Layout consists of the designing we wish to give to our app,it consists of .xml files all the designing part comes under this folder.

10.menu: This folder also consists of xml files,here we define all the menu items,we want to get in our application.

11.values: This folder consists of three files i.e. dimens.xml,string.xml,styles.xml.

1.dimens.xml:Basically this file is used for 2 purposes:

1.If you want to use multiple layouts to use the same value,then you can paste them in this file.
2.It can also be used for assigning static dimensions,it allows you to get a scaled value in Java code.

2 strings.xml: This is the file where we define our strings of text we want to display in our application.

3.styles.xml: This file basically defines the style of your application.It includes various options such as textcolor,background color etc.

12.Android Manifest:It is one of the most important file in our project.All the classes we have created is defined in this file,if want to add Splash screen,that too is given in this file,but the problem with manifest file is that even a single word change can cost you high,so you need to carefully write code in manifest.

A sample manifest.xml file looks like:

<?xml version="1.0" encoding="utf-8"?>
<manifest xmlns:android="http://schemas.android.com/apk/res/android"
    package="com.example.kodingpoint"
    android:versionCode="1"
    android:versionName="1.0" >

    <uses-sdk
        android:minSdkVersion="8"
        android:targetSdkVersion="17" />

    <application
        android:allowBackup="true"
        android:icon="@drawable/ic_launcher"
        android:label="@string/app_name"
        android:theme="@style/AppTheme" >
        <activity
            android:name="com.example.kodingpoint.MainActivity"
            android:label="@string/app_name" >
            <intent-filter>
                <action android:name="android.intent.action.MAIN" />

                <category android:name="android.intent.category.LAUNCHER" />
            </intent-filter>
        </activity>
    </application>
</manifest>


13.Project properties :It defines your properties of the project.


Sunday, 27 October 2013

How to create a new Button shape in Android

by Unknown  |  in Android at  Sunday, October 27, 2013
Basically android give us the by default Button icon,which does not seems to look professional,so in order to make it look more attractive,we have to create a new XML file specially for its shape.So you need to follow the below steps:

Firstly right click on 'res' folder and create a new Android XML file,name it shape.
Now right the following code in your Shape.xml:

<?xml version="1.0" encoding="utf-8"?>
<shape xmlns:android="http://schemas.android.com/apk/res/android" android:shape="rectangle" >

<corners
android:radius="15dp"
/>
<gradient
android:angle="45"
android:centerX="35%"
android:centerColor="#1E90FF"
android:startColor="#000000"
android:endColor="#000000"
android:type="linear"
/>
<padding
android:left="0dp"
android:top="0dp"
android:right="0dp"
android:bottom="0dp"
/>
<size
android:width="150dp"
android:height="40dp"
/>
<stroke
android:width="3dp"
android:color="#878787"
/>
</shape>

3.Now we have to link this file with the background of our button,so we simply write this code:

android:background="@drawable/shape"

4.Now we are done with changing the look of our button,compare the shapes of button,now and before:


Tuesday, 27 August 2013

Sorting program in Java

by Unknown  |  in Source Codes at  Tuesday, August 27, 2013
Sorting: Sorting is the most basic program required by many software.Sorting means to sort the list of given elements in format as required by the user.Sorting has many application areas,sorting does not mean sorting in increasing or decreasing order but as according to the requirement of the program

Here is the source code of the program in Java to sort the elements in increasing order.

Java Sorting program

import java.util.Scanner;
class sorting
{
public static void main(String args[])
{
int a,b,c,temp,i;

Scanner s=new Scanner(System.in);
System.out.println("\n\t\t\t***  SORTING IN JAVA  ***\n");
System.out.println("Enter the no of elements");
int n=s.nextInt();
int []pr=new int[n];
System.out.println("Enter the list");
for( i=0;i<pr.length;i++)
{
pr[i]=s.nextInt();
}
for(i=0;i<n-1;i++)
{
for(int k=i+1;k<n;k++)
{
if(pr[i]>pr[k])
{
temp=pr[i];
pr[i]=pr[k];
pr[k]=temp;
}
}
}
System.out.println("The sorted list is");
for( i=0;i<n;i++)
{
System.out.println(pr[i]+"\t");
}
}
}

Output of the program is:

Sorting in Java


Saturday, 24 August 2013

Binary search program in Java

by Unknown  |  in Source Codes at  Saturday, August 24, 2013
Binary search:It is the advanced and efficient searching technique as compared to Linear search.In this technique the elements are entered in sorted form.It does not compare each and every element,it firstly calculates the mid of the list and if the element is less than mid then it refines searches only to the left of the mid,if the element is greater than the mid then the search is done only from the elements present at the right of the mid.

Java program code :

import java.util.Scanner;
class binary
{
public static void main(String args[])
{
int i,mid=0;
Scanner k=new Scanner(System.in);
System.out.println("Enter number of elements you want to insert");
int n=k.nextInt();
int first=0,last=n-1;
mid=last-first/2;
int []ar=new int[n];
System.out.println("Enter elements of the list in sorted form");
for(i=0;i<ar.length;i++)
{
ar[i]=k.nextInt();
}
System.out.println("Enter element you want to search");
int item=k.nextInt();
int flag=0;
for(i=0;i<n;i++)
{
if(ar[i]==item)
{
flag=1;
break;
}
if(ar[i]<item)
{
last=mid+1;
}
else
{
first=mid-1;
}
}
if(flag==1) 
{System.out.println("Item found at " + i + " location");   } 
else
{
System.out.println("Item not found");}
}

}

Output of the program:

Binary search

Advantages of Binary search:


  • It is fast,time saving and efficient searching technique.


    Popular Posts

Proudly Powered by Blogger.